
This guide shows you how to set up a TP-Link TD-VG3631 for your OntheNet ADSL or Naked DSL service.
When to use this guide
All equipment that is supplied by OntheNet is pre-configured therefore in most cases you will only need to follow the first part of this guide to the connect the modem to your computer.
The other sections of this guide may be useful when:
- You have performed a factory reset and need to completely reconfigure the device.
- You have purchased the device from someone else and need to configure it for your OntheNet service.
1. Connect the modem/router to mains power with the supplied 12v power adaptor and switch the modem on. The power LED on the front of the modem should light up.
2. Using the grey Ethernet cable, connect one end into an Ethernet port of the modem/router (there are four from which to choose), and the other to the Ethernet/LAN port of your computer. The corresponding Ethernet LED on the front of the modem should light up.
3. For ADSL: Using the white phone cable, connect one end into the DSL port of the modem/router, and the other to the ADSL port of the line filter/splitter. Using your existing phone cable, connect one end into the phone port of the line filter/splitter and the other to the telephone. Connect the line filter/splitter to the wall socket.
4. For Naked DSL: Using the white phone cable, connect one end into the DSL port of the modem/router, and the other to the ADSL port of the wall socket (filter/splitter is not required).
Please note: All equipment that is supplied by OntheNet is pre-configured which means you only need to follow the process above to connect the modem to your computer. If you have reset the modem or purchased it elsewhere please follow these steps to configure the modem with your OntheNet user details.
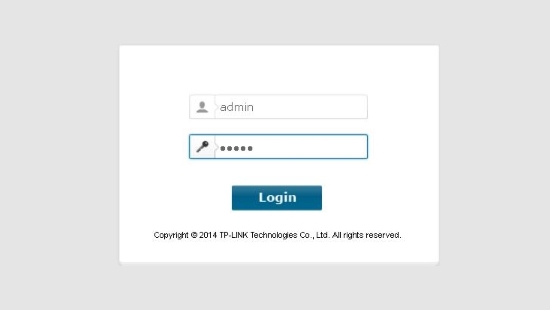
1. Once you have connected the modem to your computer (as above) open a web browser and enter 192.168.1.1 in the address bar.
2. Log in using the following details:
- Username: admin
- Password: admin
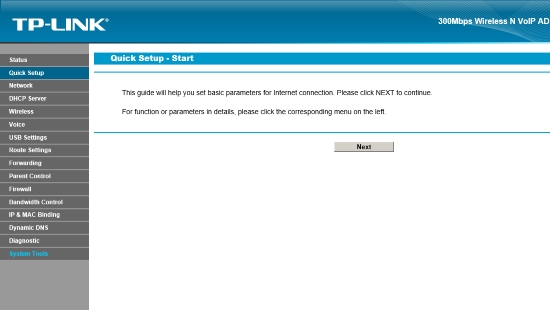
2. Click Quick Setup in the menu on the left hand side and then click Next
3. Enter the following VPI/VCI values and then click Next.
- VPI: 8
- VCI: 35

4. Choose WAN Type PPPoA and then click Next.

5. Enter your OntheNet Username and Password from your OntheNet Broadband Service Details, enter your Password again in the Confirm Password field and then click Next.

6. In the Wireless section change the settings to match the following and then click Next.
- Wi-Fi Function: Enable
- SSID: This is your wireless network name which you can set to anything you like (TP-Link by default).
- Region: Australia
- Channel: Auto
- Mode: 11bgn mixed
- Security: Select WPA-PSK/WPA2-PSK
- Password: The router has a default wireless security password. OntheNet recommends changing the wireless security password from the default.

7. Only applicable if you also have an OntheNet VoIP service, if not skip to Step 8.
Change the settings match the following and then click Next.
- Locale Selection: AU-AUSTRALIA
- Profile Name: Line ID / User ID from your OntheNet VoIP Service Details
- Phone Number: Line ID / User ID from your OntheNet VoIP Service Details
- Registrar Address: sip.onthenet.com.au
- Register Port: 5060
- Authentication Realm: sip.onthenet.com.au
- Authentication ID: Line ID / User ID from your OntheNet VoIP Service Details
- Password: Password from your OntheNet VoIP Service Details

8. On the Save screen, review the details to make sure they are correct and then click Save.
- PPP Username: must match the username from your OntheNet Broadband Service Details.
- PPP Password: must match the password from your OntheNet Broadband Service Details.
- Phone Number: applicable for VoIP services only, this must match the Line ID / User ID from your OntheNet VoIP Service Details.

9. Make sure all status fields show ‘Success’ and then click Finish.

10. Only applicable if you also have an OntheNet VoIP Service, if not skip to Step 11.
Click on the Voice section of the Menu on the left of the screen.
- For the 1st line of your OntheNet VoIP Service do the following:
- Sip Account: Edit the entry already listed and add the following extra settings.
- Outbound Proxy Port: 5080
- Preferred Codec: G.729a/b
- Ensure ‘Registry via Outbound Proxy’ is ticked.
- Phone Setup – Dial Settings – Phone 1
-
- Dial Plan Priority – voip@ Choose the Line ID / User ID which matches the 1st line in the drop down list eg: voip@2131
- Advanced Setup
- Locale Selection: AU-Australia
- Registration Expire Timeout (s): 900
- Sip Account: Edit the entry already listed and add the following extra settings.
- If you have a second line with your OntheNet VoIP Service then do the following:
- Sip Account – Add Sip account
- Profile Name: Line ID / User ID of 2nd line from your OntheNet VoIP Service Details
- Phone Number: Line ID / User ID of 2nd line from your OntheNet VoIP Service Details
- Registrar Address: sip.onthenet.com.au
- Register Port: 5061
- Authentication Realm: sip.onthenet.com.au
- Authentication ID: Line ID / User ID of 2nd line from your OntheNet VoIP Service Details
- Password: Password of 2nd line from your OntheNet VoIP Service Details
- Outbound Proxy Port: 5081
- Preferred Codec: G.729a/b
- Ensure ‘Registry via Outbound Proxy’ is ticked.
- Phone Setup – Dial Settings – Phone 2
- Dial Plan Priority – voip@ Choose the Line ID / User ID which matches the 2nd line in the drop down list eg: voip@2132
- Sip Account – Add Sip account
11. Restart the modem (turn it off for 30 seconds and then turn it on) and wait until the Internet light goes solid.
12. To check the broadband connection confirm you are able to browse the internet by simply doing a unique Google search.
13. Only applicable if you also have an OntheNet VoIP Service:
- To test the VoIP configuration connect a telephone to the Phone 1 port on the modem and dial the test number 8378. If the call is successful you will hear the Echo Test message. If you have a second line you can test it in the same way by connecting the telephone to the Phone 2 port.