This guide shows you how to set up a TP-Link TD-W8960N for your OntheNet ADSL or Naked DSL service.
When to use this guide
All equipment that is supplied by OntheNet is pre-configured therefore in most cases you will only need to follow the first part of this guide to the connect the modem to your computer.
The other sections of this guide may be useful when:
- You have performed a factory reset and need to completely reconfigure the device.
- You have purchased the device from someone else and need to configure it for your OntheNet service.
1. Connect the modem/router to mains power with the supplied 9v power adaptor and switch the modem on. The power LED at the front of the modem should light up.
2. Using the grey Ethernet cable, connect one end into an Ethernet port of the modem/router (there are four from which to choose), and the other to the Ethernet/LAN port of your computer. The corresponding Ethernet LED at the front of the modem should light up.
3. For ADSL: Using the white phone cable, connect one end into the DSL port of the modem/router, and the other to the ADSL port of the line filter/splitter. Using your existing phone cable, connect one end into the phone port of the line filter/splitter and the other to the phone. Connect the line filter/splitter to the wall socket.
4. For Naked DSL: Using the white phone cable, connect one end into the DSL port of the modem/router, and the other to the ADSL port of the wall socket (filter/splitter is not required).
Please note: All equipment that is supplied by OntheNet is pre-configured which means you only need to follow the process above to connect the modem to your computer. If you have reset the modem or purchased it elsewhere please follow these steps to configure the modem with your OntheNet user details.
1. Once you have connected the modem to your computer (as above) open a web browser and enter 192.168.1.1 in the address bar.
2. Log in with the following details.
- Username: admin
- Password: admin
2. Click on the Quick Setup link on the left hand side and then click Next
3. In WAN Configurations ensure the ADSL WAN option is selected and then click Next
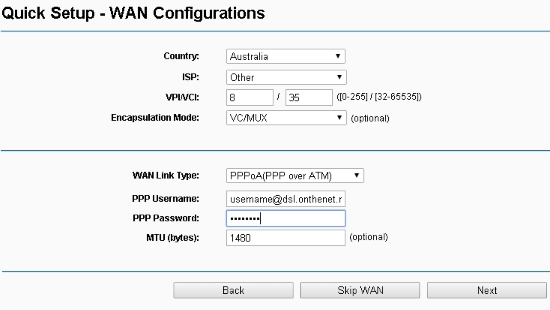
4. Enter the following settings and then click Next
- Country: Australia
- ISP: Other
- VPI: 8 / VCI: 35
- Encapsulation Mode: VC/MUX
- WAN Link Type: PPPoA(PPP over ATM)
Note: PPPOE will be selected by default and should be changed to PPPOA. - PPP Username: enter username from your OntheNet Broadband Service Details
- PPP Password: enter password from your OntheNet Broadband Service Details
- MTU (bytes): 1480
5. In the Wireless Configuration section enter the following details and then click Next
- Enable Wireless: this should be ticked
- Wireless Network Name: is TP-Link by default unless you would like something different.
- Network Authentication: WPA2-Personal
- Wireless Network Key: The router has a default wireless security password. OntheNet recommends changing the wireless security password from the default.

6. On the Summary Screen, review the details to make sure they are correct and then click Confirm
- PPP Username: must match the username from your OntheNet Broadband Service Details
- PPP Password: must match the password from your OntheNet Broadband Service Details

7. Click Wireless in the menu on the left, enter the following and then click Apply.
- Country: Australia
8. Select Security from the Wireless menu on the left, enter the following and then click Confirm
- Enable WPS: Disabled
- WPA-Encryption: TKIP & AES

9. Restart the modem (turn it off for 30 seconds and then turn it on) and wait until the Internet light goes solid.
10. To check the broadband connection confirm you are able to browse the internet by simply doing a Google search.


